Fundametals of CUDA C/C++
Introduction
CUDA is a parallel computing platform developed by NVIDIA that allows general-purpose computing on GPUs (GPGPU). It is widely used in the fields related to high-performance computing, such as machine learning and computer simulation.
Typically, the parallelism and performance on GPUs are much higher than on CPUs. Let’s look at the FLOPs of some latest CPU and GPU chips. With less than double prize, NVIDIA A100 offers nearly 26 times better performance than today’s most powerful CPU.
| Chips | Performance (TFLOPs) | Price in 2024 |
|---|---|---|
| AMD Ryzen™ Threadripper™ PRO 7995WX | 12.16 | USD 10,000 |
| NVIDIA Tesla A100 | 312 | USD 18,000 |
In this article, we will discuss the basic methodology on CUDA programming.
Before You Start
NVIDIA offers a command line tool nvidia-smi (system management interface) to show the information of the GPU installed on the computer. Don’t worry if you do not have a NVIDIA GPU, simply turn to Google Colab for a free GPU environment. The rest of the article will be done on Google Colab.
After we connect to a GPU runtime on Colab, we can now run nvidia-smi in the interactive environment to see the information of the GPU installed. Note that we are in a Python environment and ! before system commands tells the environment to run it in a Linux shell.
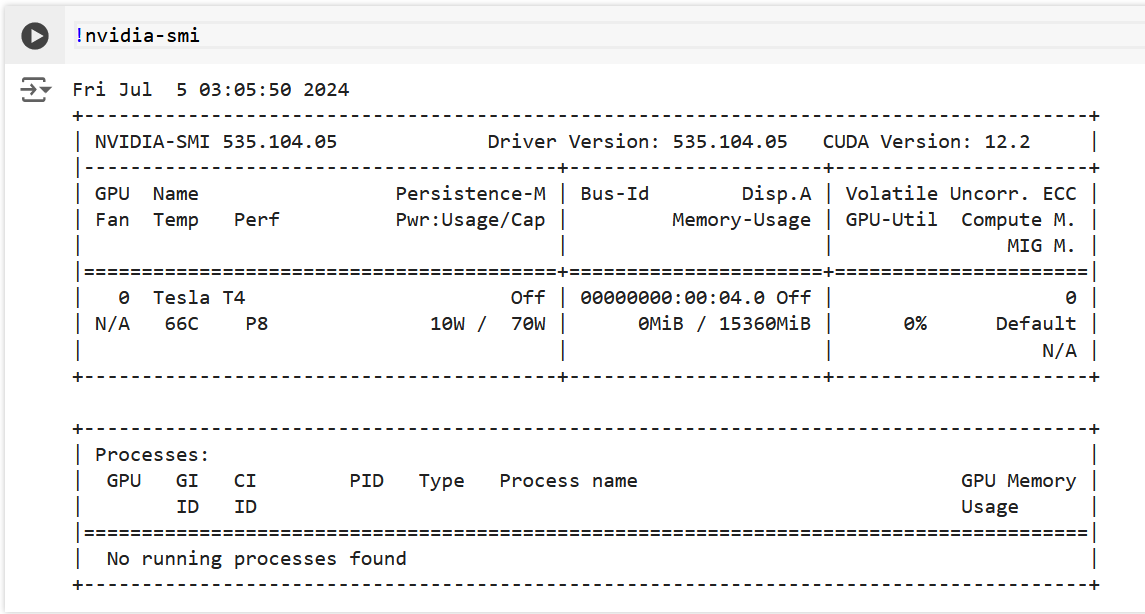
Great! We now have a Tesla T4 GPU! Make sure you have seen similar outputs and we will now move on to our next topic.
CUDA Programming Basics
The prefix of a file in the CUDA language is .cu, and a CUDA file can be compiled along with C/C++/Fortran easily with the help of CMake. However, it is not today’s topic and we will simply stop here.
Our First CUDA Program
Before we talk about CUDA, let’s first look at a C program that we are already familiar with.
1 |
|
Straightforward, right? After rename the file as first.cu, we can compile it with CUDA compiler, just like what we usually do with a C compiler.
1 | !nvcc first.cu -o first -run |
nvcc is the CUDA compiler, -o specified the name of the output executable file, -run executes the binary file right after the compilation process finishes. Now we can see the output from the program.
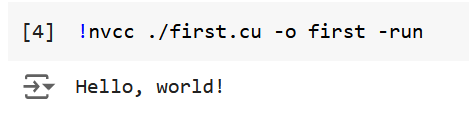
The output is expected. However, it is nothing different from what we usually do in C, since what we have written is exactly a C program. Now we will refactor the program so that it runs on GPU. In the context of CUDA programming, CPU is usually called host and GPU device. A function that runs on device is called kernel function. The return value of a kernel function must be void. To enable some function to run on device, we must add some special qualifier before the function. Here we list common qualifiers and explained their meanings.
| Qualifiers | Meanings |
|---|---|
| __global__ | The function is executed on device, called by host. |
| __device__ | The function is executed on device, called by device. |
| __host__ | The function is executed on host. This is the default choice when we omit the qualifier. |
In this article, tasks are assigned by the host to the device, so we will only use the __global__ qualifier and default qualifier (no qualifier).
To launch a kernel function (don’t forget what is a kernel), we use triple angle brackets to specify the configuration of the kernel function. Let’s look at an example. The kernel function is defined here,
1 | __global__ void printHelloWorld() { |
and called here.
1 | int main() { |
The configuration of the kernel will be explained later. Note that a kernel function is asynchronous, which is to mean that the host won’t wait for the kernel function to finish. Rather, the host will continue to execute the codes below. Function cudaDeviceSynchronize() let host wait for all the kernels to finish. Let’s put it together and look at the results. The complete CUDA program should look at this:
1 |
|
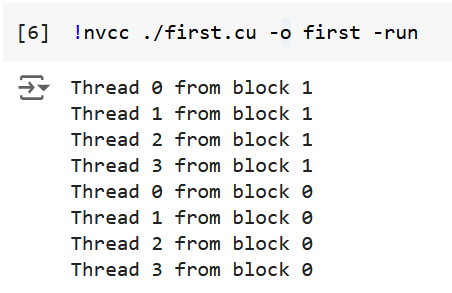
Now we compile and run the program
1 | !nvcc first.cu -o first -run |
And we get the results

which shows our program are truly running on GPU!
CUDA Thread Hierarchy
Kernel Configuration
In the past section, we haven’t really talked about what does the parameters in the triple angle brackets actually denote. Let’s look at the CUDA thread hierarchy.
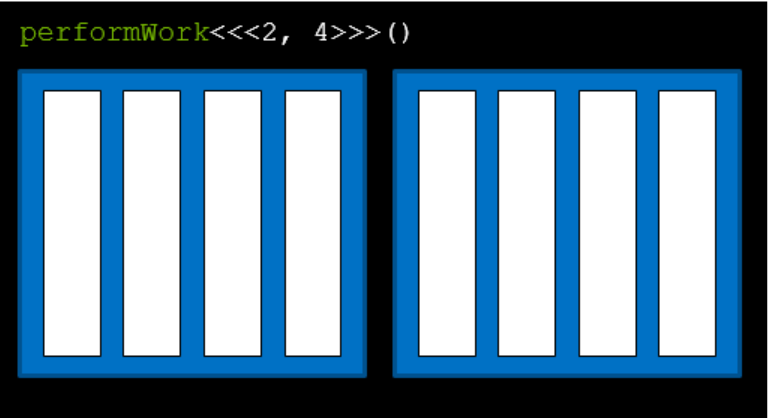
CUDA follows a grid-block-thread hierarchy. The overall structure is called grid, which is in black and contains blocks. The first parameter denotes number of blocks and the second parameter denotes threads per block. Blocks are painted blue and threads white in the slide. So, kernel function performWork<<<2, 4>>> actually says, the host assigns work to 2 blocks, with 4 threads each. Now you can explain why we have seen two echoes in our first CUDA program.
A thread can get its block index and thread index within the block by variables blockIdx.x and threadIdx.x, which are available directly in the definition of a kernel function.
Let’s look at an example,
1 |
|
which gives the output:
There are two more variables gridDim.x and blockDim.x, meaning the number of blocks in a grid and the number of threads in a block respectively and corresponding to the two parameters we passed when launched the kernel function.
You might wonder why there is a .x after each variable. The truth is that both the blocks and threads can be place in 3 dimensions. With the help of class dim3, we can pass a multi-dimensional configuration into a kernel. This trick is only for convenience in some particular applications, for example matrix operations, and would do nothing to the performance.
1 | performWork<<<dim3(2,2,1), dim3(2,2,1)>>>(); |
The hierarchy of the configuration above will look like this:
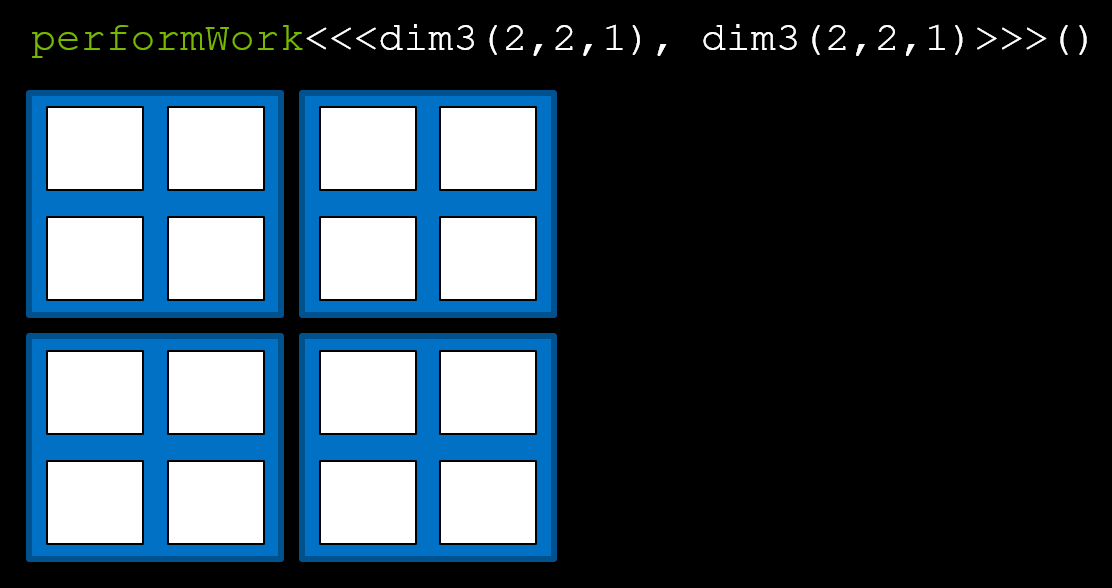
Now we can access these values with gridDim.x, gridDim.y, gridDim.z, blockDim.x, blockDim.y, blockDim.z(), blockIdx.x, blockIdx.y, blockIdx.z, threadIdx.x, threadIdx.y, threadIdx.z.
These values are important for many calculations, as we will discuss later with memory.
Streaming Multiprocessors
In this section, we explain streaming multiprocessors (SMs) and offer a simple rule for picking proper numbers for numberOfBlocks and threadsPerBlock.
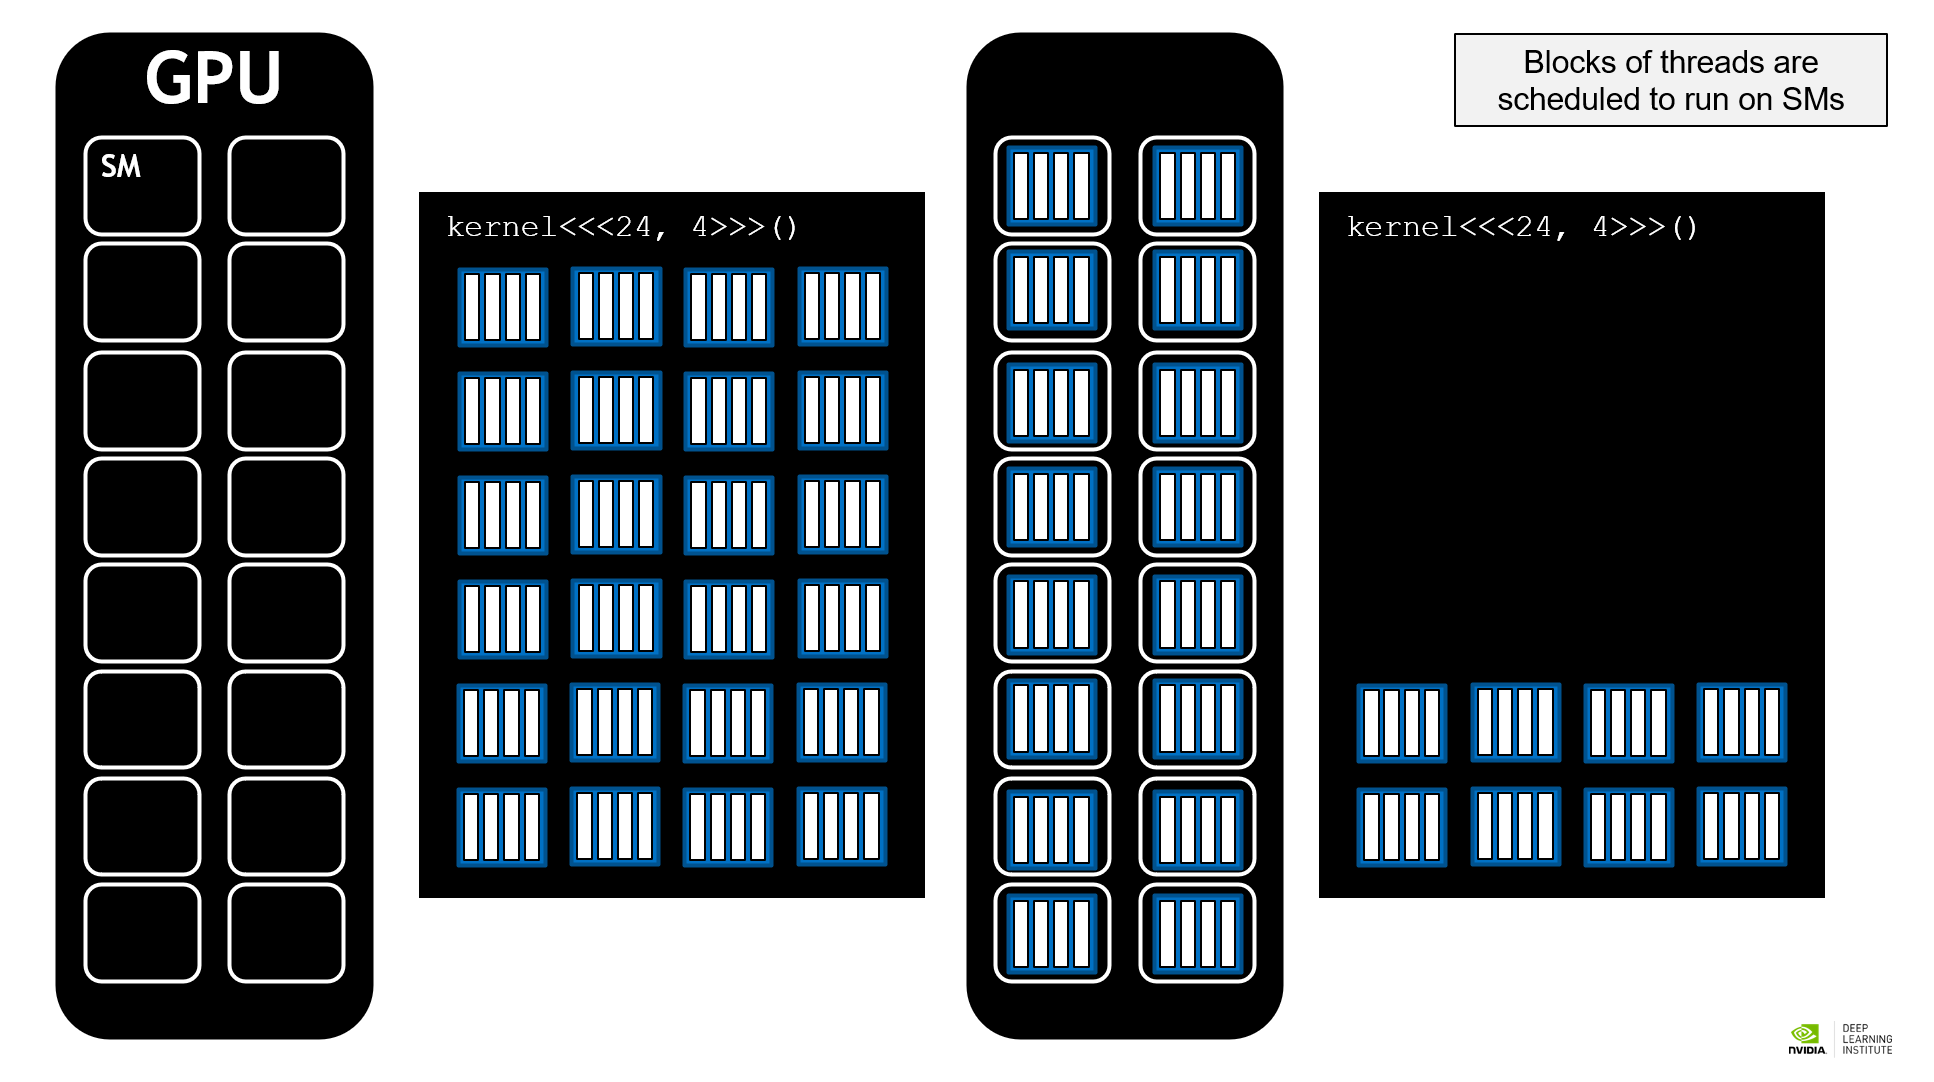
SMs are basic units that execute tasks. As shown in the figure above, blocks are scheduled to run on SMs. When the number of blocks is multiple of the number of SMs, the execution will be efficient. Therefore, we cannot hardcode numberOfBlocks and may use an API to get a value for a particular machine instead. Usually, taking numberOfBlocks as numberOfSMs times 16, 32, or 64 would be a good choice.
As for threadsPerBlock, it can be any integer between 1 and 1024. 512 usually becomes a good choice.
Here is an example that we call a CUDA API to get the number of SMs. The official reference for struct cudaDeviceProp is here.
1 | int deviceId; |
Then, we can create a kernel configuration like this
1 | int numberOfBlocks = numberOfSMs * 32; |
CUDA Streams
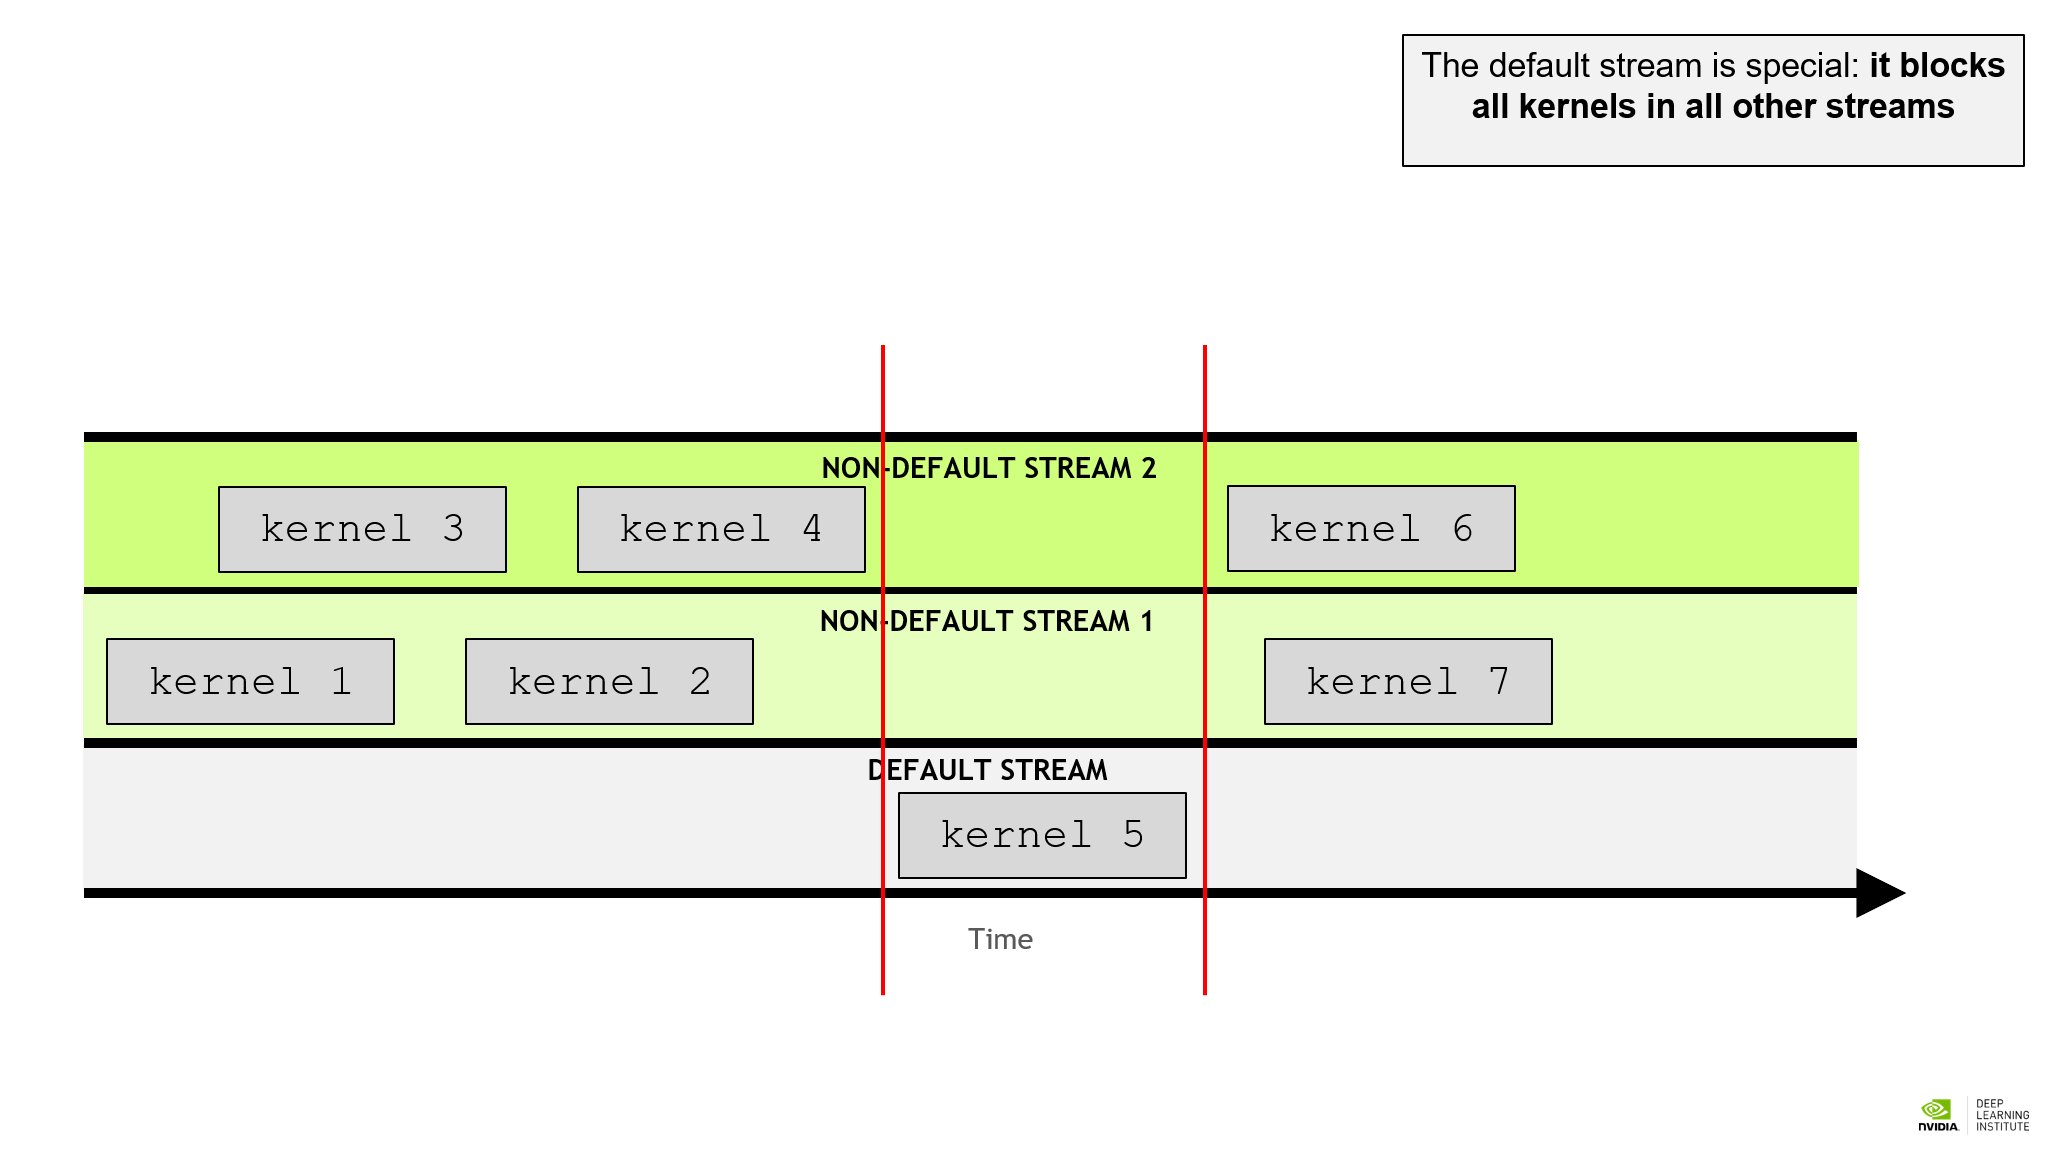
GPU tasks are scheduled in streams and the kernels in one stream is serial. Before, we didn’t specify the stream and the kernels are executed in the default stream. Default streaming is blocking. That is to mean, when there is a task scheduled in the default stream, all the tasks on the non-default streams will be blocked, while all the other non-default streams are non-blocking, allowing concurrent kernel execution. CUDA offers a stream class cudaStream_t and they are created with cudaStreamCreate() and destroyed with cudaStreamDestroy(). As we didn’t mention before, a kernel configuration actually accepts 4 parameters, numberOfBlocks, threadsPerBlock, sharedMemoryBytes, and stream. We just left the latter 2 parameter in defaults before. Here is an example with concurrent streams.
1 | cudaStream_t stream1; |
In this part of program, the kernels in stream1 and stream2 will be concurrent. Since we don’t need shared memory here, we just left them in 0. Note that although cudaStreamDestroy() returns immediately after calling, the streams are not actually destroyed until the kernels in the stream finish, so we don’t need to worry about the side effect of destroying a stream.
CUDA Memory Management
So far, we have discussed how to launch a kernel running on device. However, such kernels could only access memory automatically allocated. That is, local variables in kernel function definition. We wish to allocate memory that can be accessed by both the host and the device. CUDA offers a unified memory model so that we don’t need to worry about memory access.
Unified Memory
Allocation and Freeing
To allocate unified memory that can be accessed both on the device and the host, we call cudaMallocManaged() function.
1 | int N = 2<<20; |
Thus, the integer array can be accessed both on the device and the host. To free allocated unified memory, we call cudaFree() utility.
1 | cudaFree(array); |
Reduce Page Faults
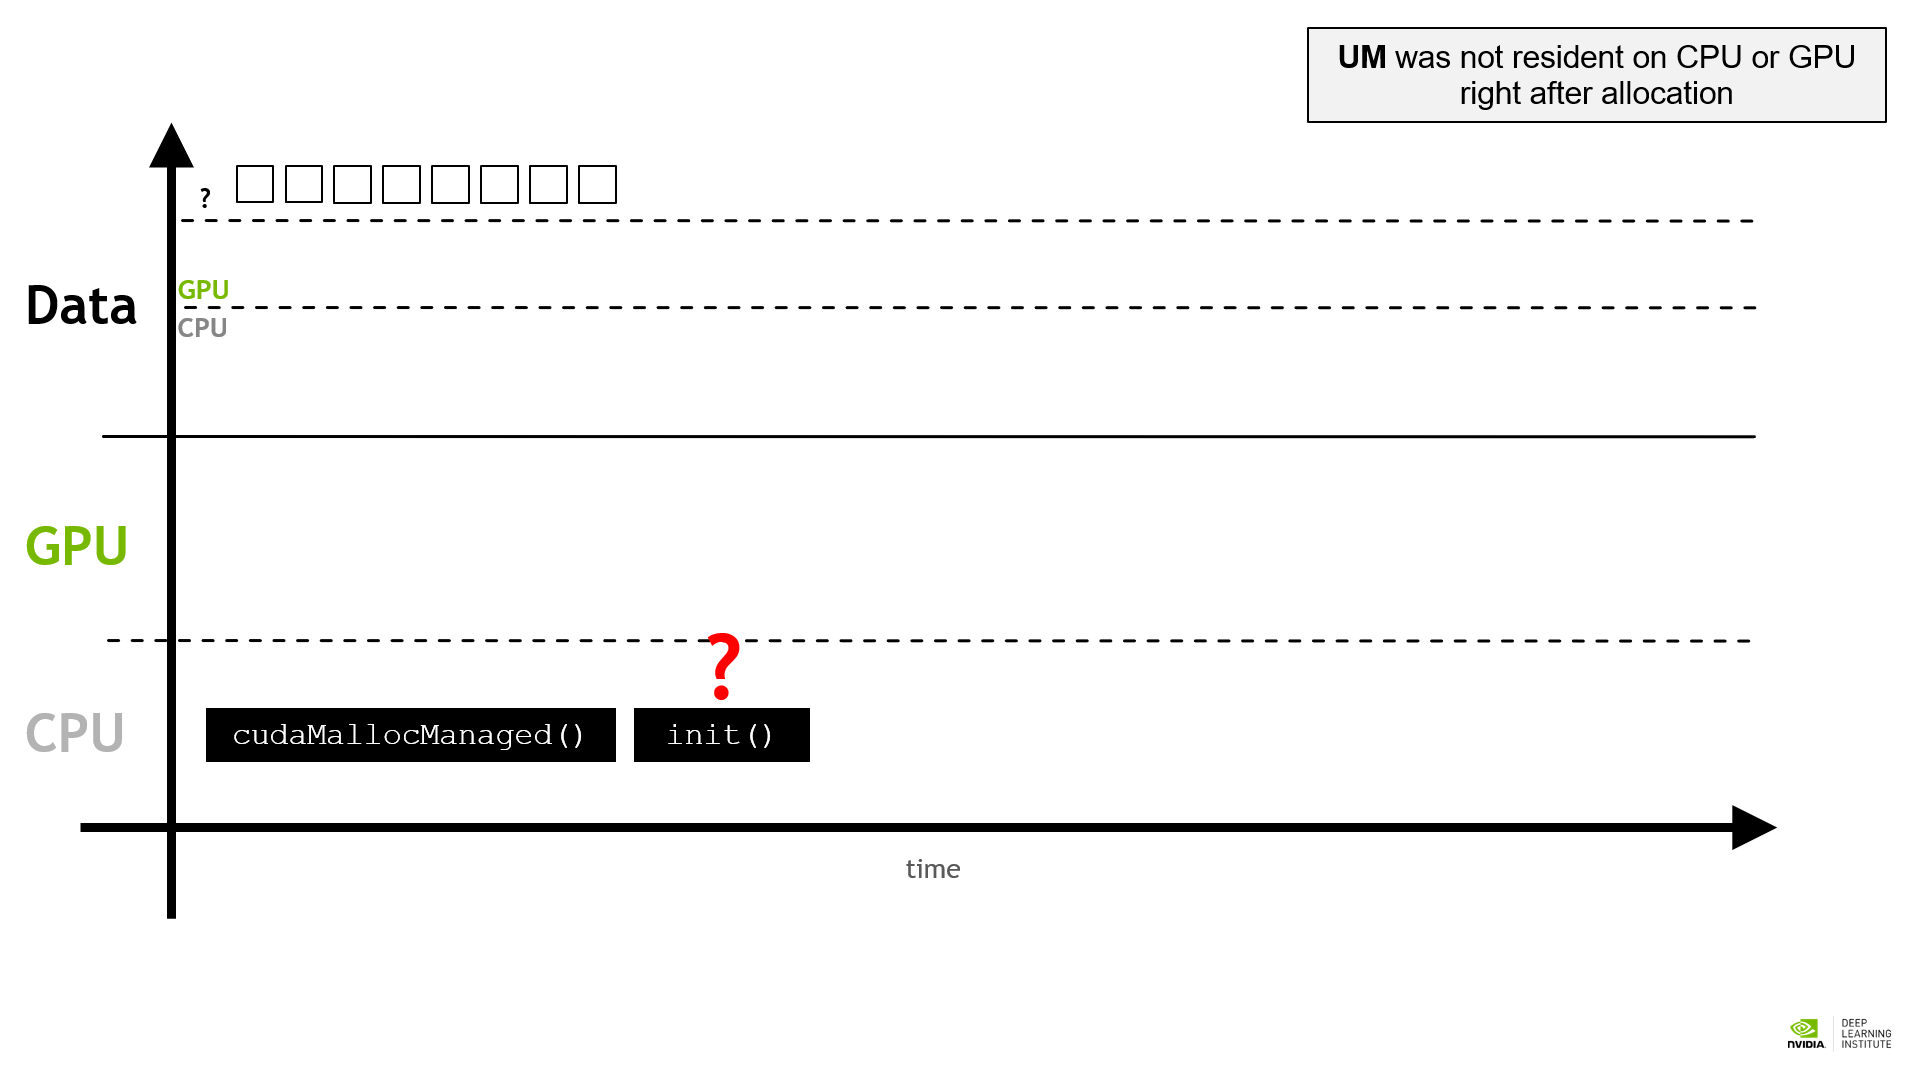
When UM was initially allocated, it may not be resident on CPU or GPU. If the memory was first initialized by CPU then GPU, a page fault occurs. Memory will be transferred from host to device and slow down the tasks. Similarly, if UM was initialized on GPU and then accessed by CPU, a page fault occurs and memory transfer begins. The place memory is resident on depends on the last access. When a page fault is present, memory is transferred is small batch size. If we can predict a page fault, we can transfer the corresponding memory in advance with bigger batch size to increase the efficiency. CUDA offers an API called cudaPrefetch to perform such behaviors. Here is an example.
1 | int deviceId; |
The third parameter of cudaPrefetchAsync specifies the direction of memory transfer. When filled with deviceId, the memory is transferred from host to device (HtoD), while cudaCpuDeviceId specifies a transfer from device to host (DtoH). Note that the variable cudaCpuDeviceId can directly be accessed globally and we need no APIs to get this variable.
Index Calculation
With unified memory, we can finally schedule some tasks on GPU. Let’s look at an example. Suppose we have two vectors containing integers, each with length 2^22, and we want to accelerate vector addition with CUDA. Our number of threads might no be bigger enough to establish a bijection between thread indices and vector indices, so a thread must execute more than one addition. The convention is to define a variable stride that equals to the total number of threads in a (also the only) grid, and increase the loop index by stride each time. We assume the kernel configuration is 1-d and here is how we calculate index. Note that we are checking index boundary each time to avoid unexpected memory access.
1 | __global__ void vectorAdd(int* a, int* b, int* res, int N) { |
Manual Memory Management and Streaming
Basic Commands
Although UM is powerful enough, we may still want to manage the memory ourselves to further optimize the efficiency. Here are some commands for manually managing the memory.
cudaMallocwill allocate the memory on GPU. The memory is not accessible on CPU.cudaFreefrees the memory allocated on device.cudaMallocHostwill allocate the memory on CPU just like what a normalmallocdoes. The memory will be page locked on host. Too many page locked memory would reduce CPU performance.cudaFreeHostfrees the memory allocated on host.cudaMemcpycopies the memory DtoH or HtoD, instead of transferring.cudaMemcpyAsyncallows asynchronously memory copying (explained later).
Let’s look at an example.
1 | int N = 2<<20; |
Note that cudaMemcpy first accepts the destination pointer then source pointer, unlike Linux cp first-source-then-destination convention. cudaMemcpyDeviceToHost and cudaMemcpyHostToDevice are two variables that can be directly and globally accessed that specify the direction of memory copying.
Asynchronous Memory Copying
In the last example, memory copy starts after kernel finishes. To optimize the process, we can start asynchronous (or concurrent) memory copying right after a part of kernel finishes.
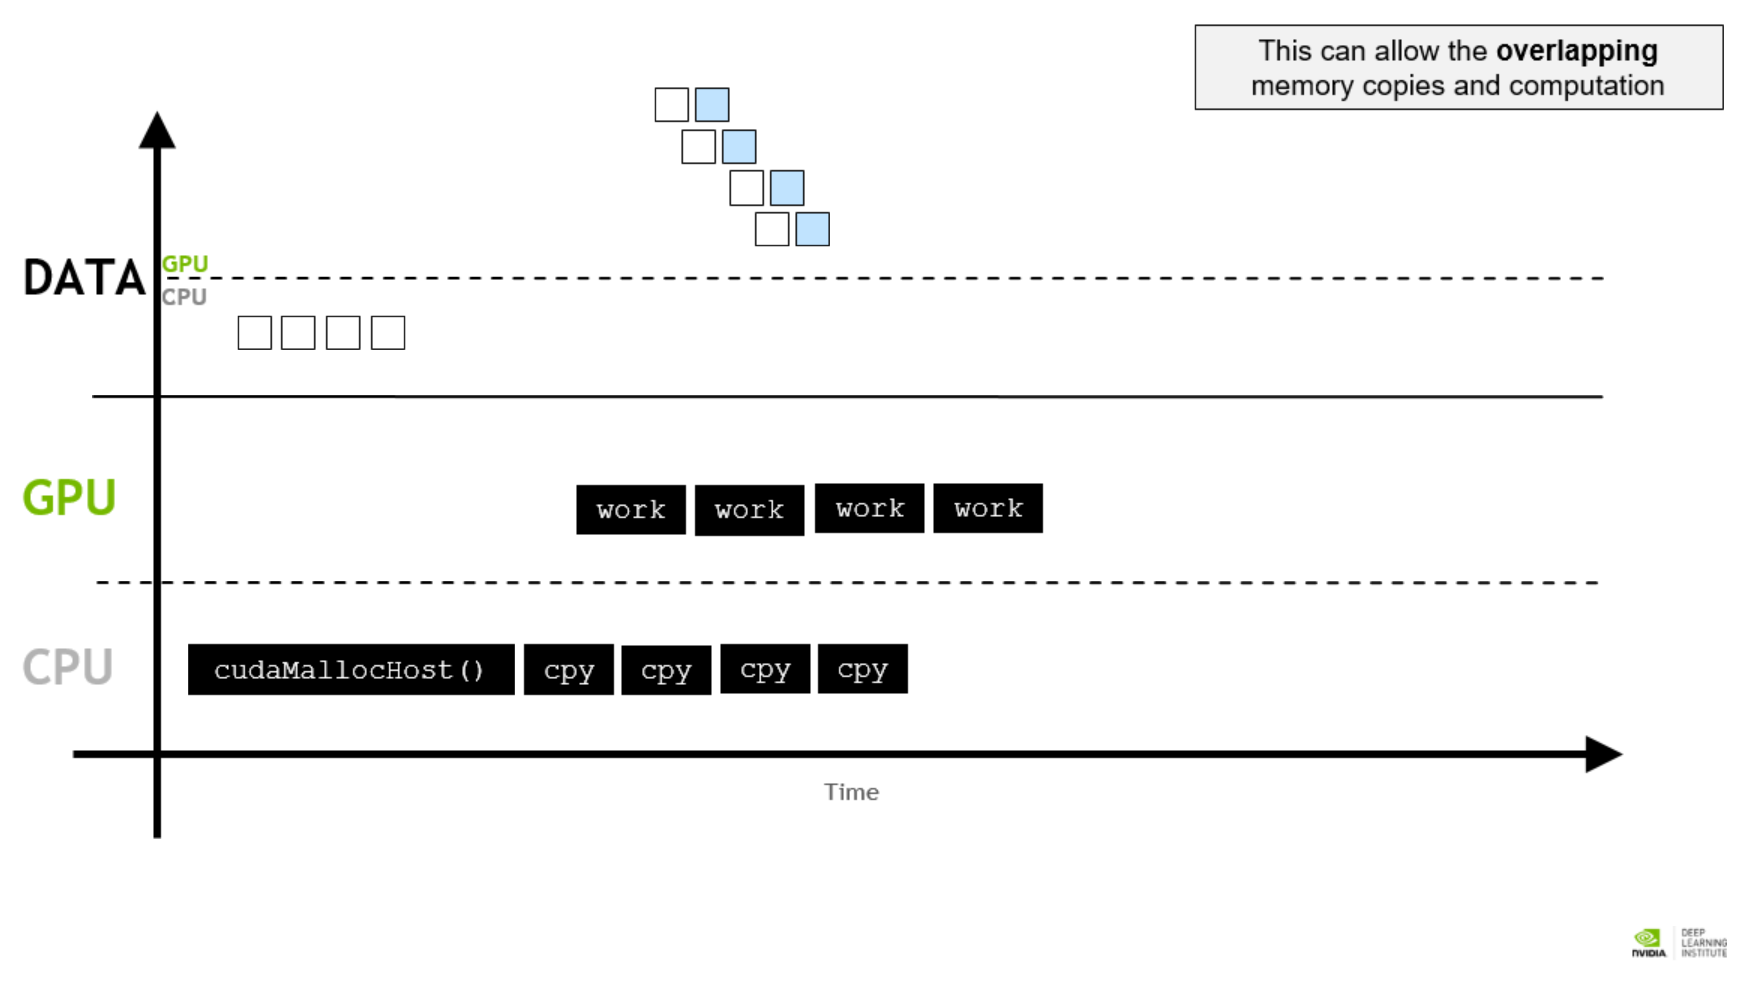
An simple approach is to divide the kernel in several segments. A segment of memory copying starts right after a segment of kernel finishes. We will refactor the former vector addition program and take it as an example.
1 | // Perform vector addition in segments |
The piece of program above divides the kernel vectorAdd in 4 segments. After one segment of kernel finishes, asynchronous memory copying starts. Every stream first executes the kernel then copying the corresponding memory to the host. Note that we must carefully handle all the indices here to avoid illegal memory access. After all of theses are done, the stream is destroyed (recall stream destruction behavior). The whole accelerated program is pasted below for your reference. Don’t forget to destroy unused streams and free unused memories.
1 |
|
Error Handling
CUDA usually does not report runtime errors, so we must detect and record them manually. CUDA offers a class cudaError_t to handle errors. The return values of CUDA APIs are cudaError_t, allowing us to catch error directly.
1 |
|
This program will throw an error because -1 is not a valid size.
1 | Error: out of memory |
However, the return values of custom kernels are void, meaning we cannot catch error in the same way when launching those kernels. CUDA offers cudaGetLastError to catch the last error thrown. Also, we can create a utility function to encapsulate such processes.
1 | inline void checkCudaError() { |
Therefore, we can check the errors when launching kernels.
1 | some_kernel<<<-1, -1>>>(); |
which yields
1 | Error: invalid configuration argument |
Such error handling may help debug the CUDA program.
Performance Profiling
NVIDIA Nsight Systems command line tool (nsys) is a command line profiler that will gather following information:
- Profile configuration details
- Report file(s) generation details
- CUDA API Statistics
- CUDA Kernel Statistics
- CUDA Memory Operation Statistics (time and size)
- OS Runtime API Statistics
To install nsys in Colab, run the following commands:
1 | !wget https://developer.download.nvidia.com/compute/cuda/repos/ubuntu2204/x86_64/nsight-systems-2023.2.3_2023.2.3.1001-1_amd64.deb |
Then, we can profile the running information of our CUDA program. Here we take vector addition as an example. profile means we want to profile the executable and --stats=true tells nsys to print all the information.
1 | !nsys profile --stats=true vector-add |
A part of printed information is pasted below:
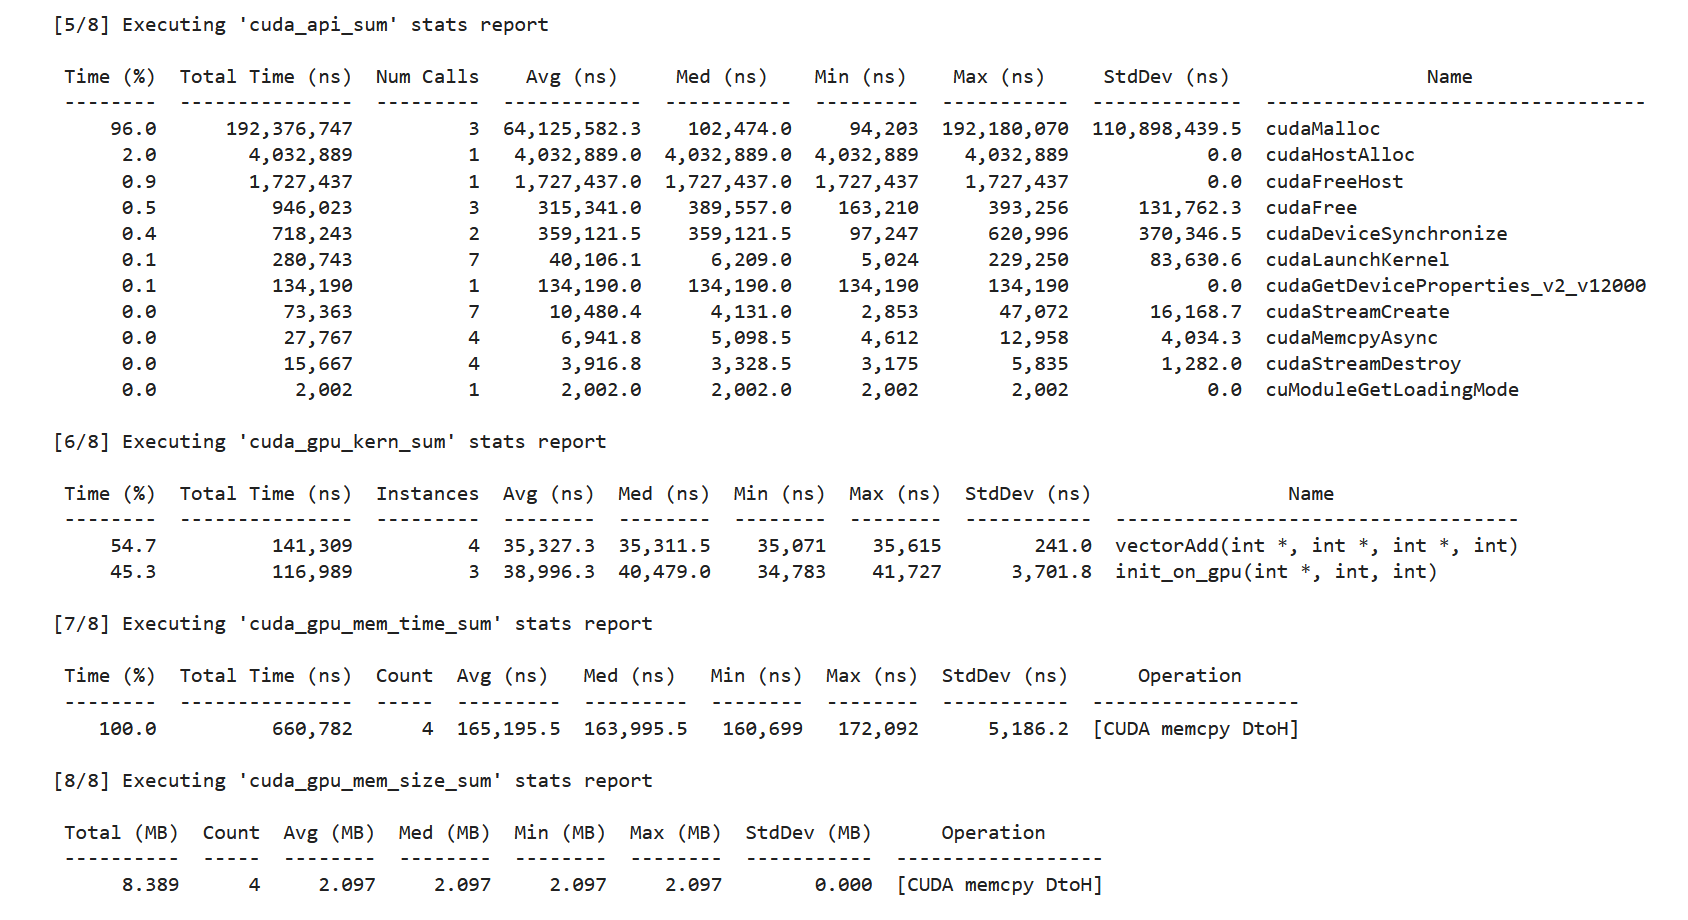
Here we can trace the running time of kernels and the memory behavior. You can compare the results of different numberOfBlocks and see what kind of memcpy page faults will bring about.
Final Exercise
An n-body simulator predicts the individual motions of a group of objects interacting with each other gravitationally. Below is a simple, though working, n-body simulator for bodies moving through 3 dimensional space.
In its current CPU-only form, this application takes about 5 seconds to run on 4096 particles, and 20 minutes to run on 65536 particles. Your task is to GPU accelerate the program, retaining the correctness of the simulation.
Considerations to Guide Your Work
Here are some things to consider before beginning your work:
- Especially for your first refactors, the logic of the application, the
bodyForcefunction in particular, can and should remain largely unchanged: focus on accelerating it as easily as possible. - The code base contains a for-loop inside
mainfor integrating the interbody forces calculated bybodyForceinto the positions of the bodies in the system. This integration both needs to occur afterbodyForceruns, and, needs to complete before the next call tobodyForce. Keep this in mind when choosing how and where to parallelize. - Use a profile driven and iterative approach.
- You are not required to add error handling to your code, but you might find it helpful, as you are responsible for your code working correctly.
1 |
|